封装和发布自己的SOAP API
基于AWS PaaS的API架构,应用开发者可以使用Java语言封装和发布自己的SOAP API。
步骤
- 在您的App Java工程中编写Java类
- 使用Java注解,声明服务类型和参数结构
- 确定API请求的返回类型
- 发布和浏览服务
- 配置访控策略(适用于6.4.1及后续版本)
- 配置身份策略(适用于6.4.1及后续版本)
- 配置流控策略(可选)(适用于6.4.1及后续版本)
- 测试发布的API
- 上下线服务(适用于6.4.1及后续版本)
步骤1:在您的App Java工程中编写Java类
获得本地开发环境,请移步这里。
步骤2:使用Java注解,声明服务类型和参数结构
SOAP服务类是一个普通pojo类,该类可以使用JAX-WS规范的JDK注解。还可以使用HTTP API的注解,这样该Java类将同时允许以HTTP和SOAP方式访问。
| 注解 | 说明 |
|---|---|
| @WebService | JAX-WS注解,详细可参考这里 |
示例
@WebService(serviceName = "DemoApi")
public class SayHello {
    ...
}
| 注解 | 说明 |
|---|---|
| @WebParam | JAX-WS注解,详细可参考这里 |
示例
    // 返回简单String
    public StringResponse say(@WebParam(name = "str1") String str1) {
        StringResponse r = new StringResponse();
        r.setData(str1);
        System.out.println(str1);
        return r;
    }
完整的示例代码参见本章节下方源码
步骤3:确定API请求的返回类型
同HTTP API,请点击这里。
步骤4:发布和浏览服务
将编写的程序编译成jar,存放到您自己的应用lib目录下(假设应用名称是com.abc.apps.do,那么路径应该在%AWS-HOME%/apps/install/com.abc.apps.do/lib),如果开发者引用了三方jar资源,也一同存放到该目录下。
正常情况,这些jar资源将被动态加载到AWS PaaS容器,自动完成发布。当处于开发调试环境时,若首次未自动发布,可重启本地的AWS PaaS服务。
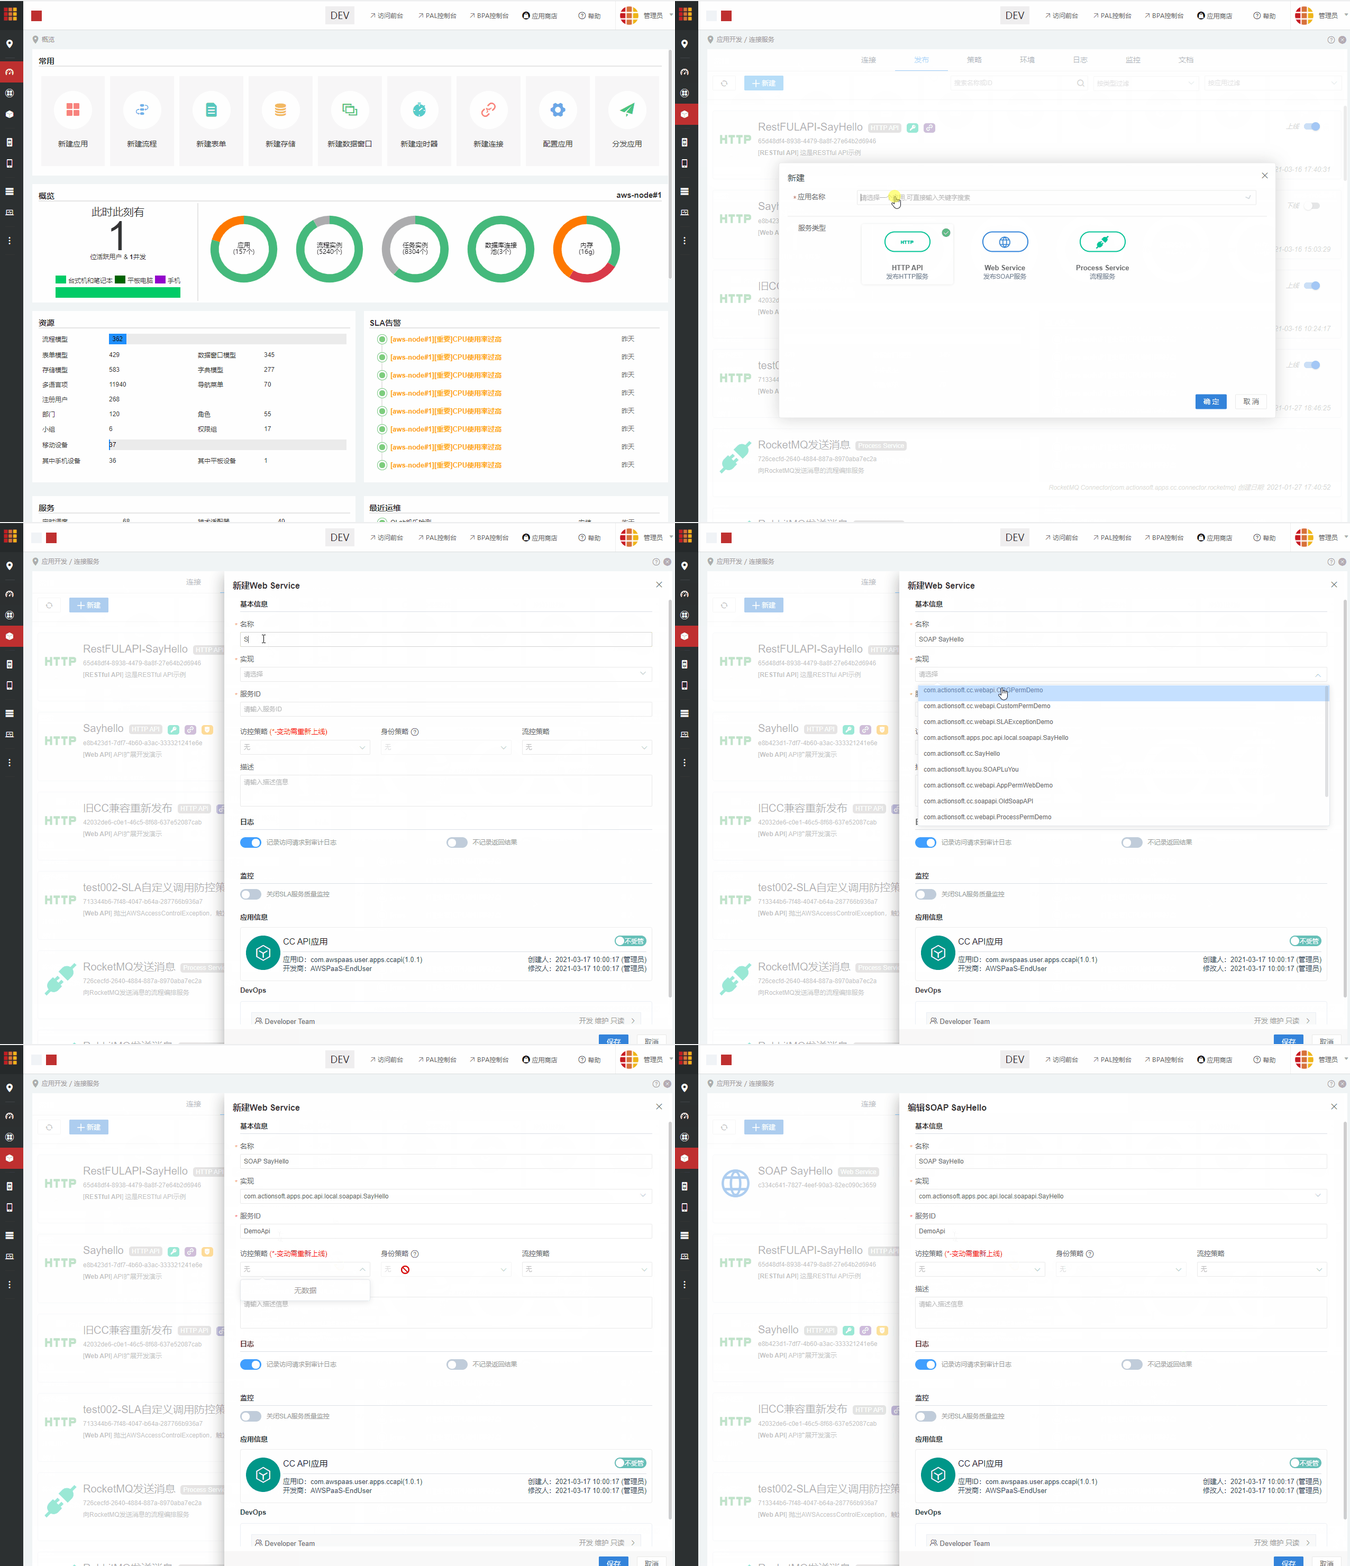
然后进入CC连接服务,选择发布 >Web Service发布SOAP API。
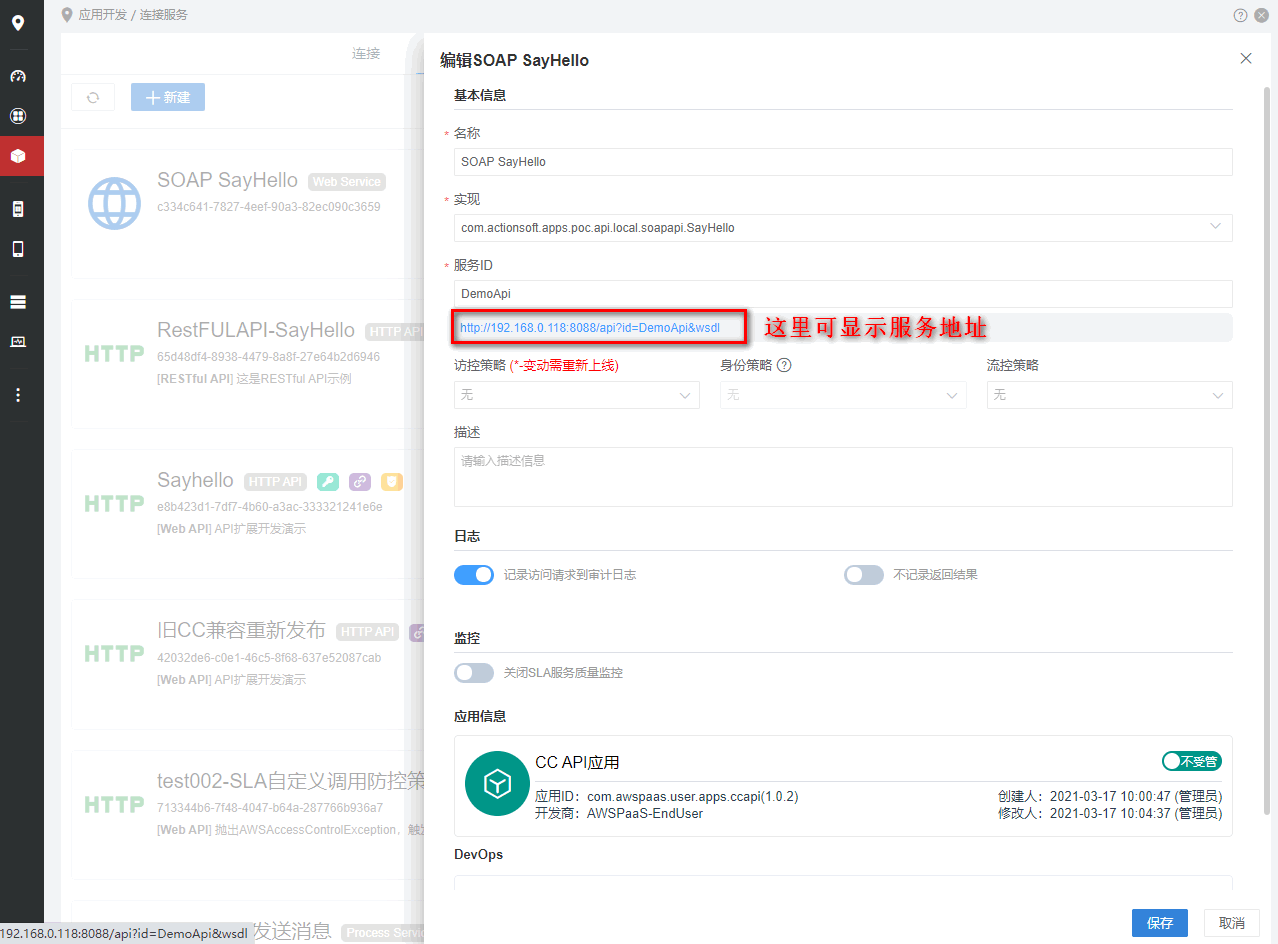
本地开发者试着在浏览器输入服务地址
步骤5:配置访控策略
1.修改API封装代码,增加访控注解,并编译jar放入应用lib目录下
| 注解 | 说明 |
|---|---|
| @PermRequire({}) | 类注解,{}内写支持的类型,如@PermRequire({RequireType.APP,RequireType.ORG}) |
| RequireType.ALL | 访控范围支持所有类型 |
| RequireType.APP | 访控范围支持应用 |
| RequireType.ORG | 访控范围支持组织 |
| RequireType.PROCESS | 访控范围支持流程 |
| RequireType.BO | 访控范围支持BO |
| RequireType.CUSTOM | 访控范围支持自定义 |
| --- | --- |
| @PermApp | 方法参数注解,类型为应用,匹配应用ID |
| @PermBO | 方法参数注解,类型为BO,匹配BO模型ID或BO表名称 |
| @PermTaskId | 方法参数注解,类型为流程,匹配任务实例ID |
| @PermProcess | 方法参数注解,类型为流程,匹配流程定义ID |
| @PermInstId | 方法参数注解,类型为流程,匹配流程实例ID |
| @PermTeam | 方法参数注解,类型为组织,匹配群组ID |
| @PermRole | 方法参数注解,类型为组织,匹配角色ID |
| @PermUser | 方法参数注解,类型为组织,匹配用户UID |
| @PermDepartment | 方法参数注解,类型为组织,匹配部门ID |
| @PermCompany | 方法参数注解,类型为组织,匹配单位ID |
| @PermCustom | 方法参数注解,类型为自定义,匹配英文逗号分隔的值 |
完整的示例代码参见本章节下方源码
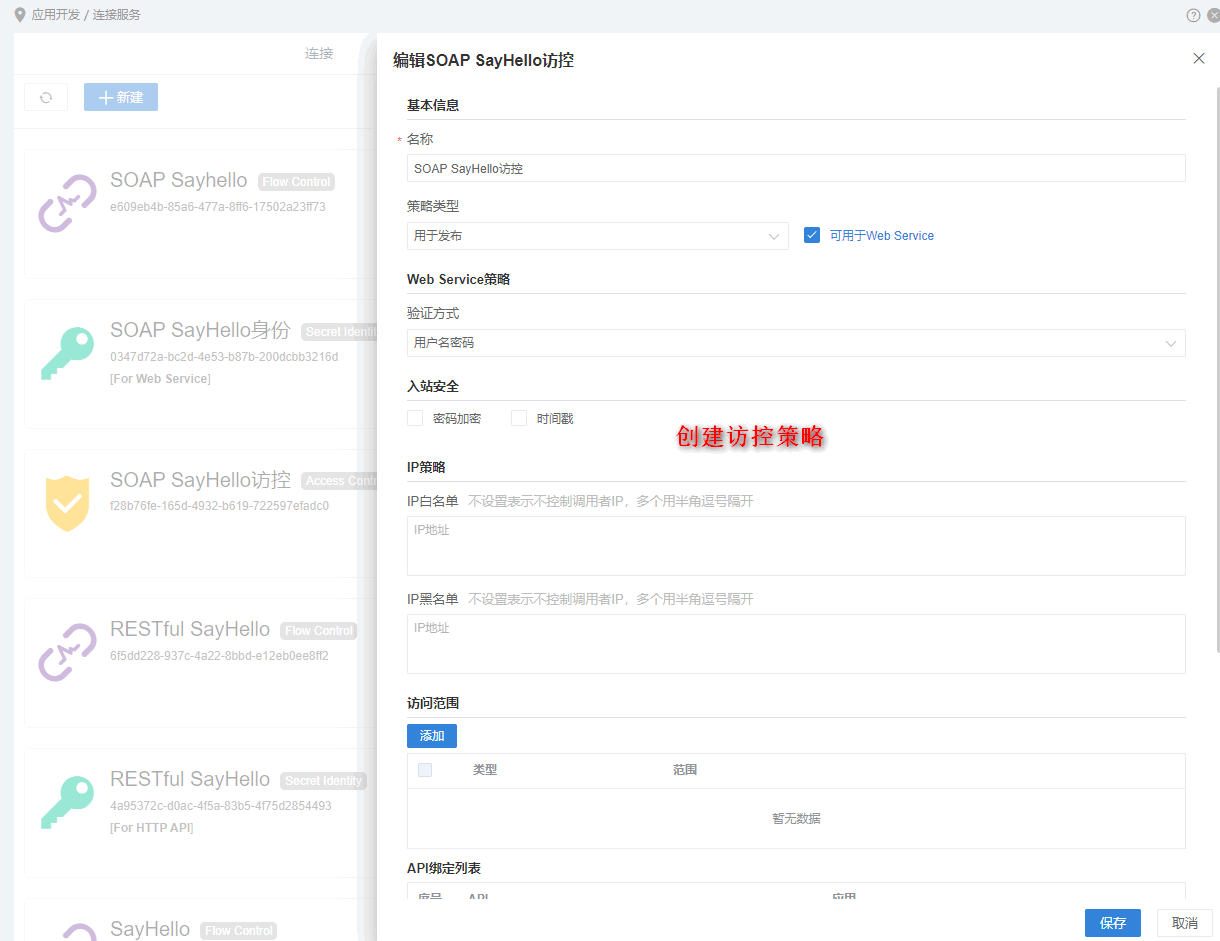
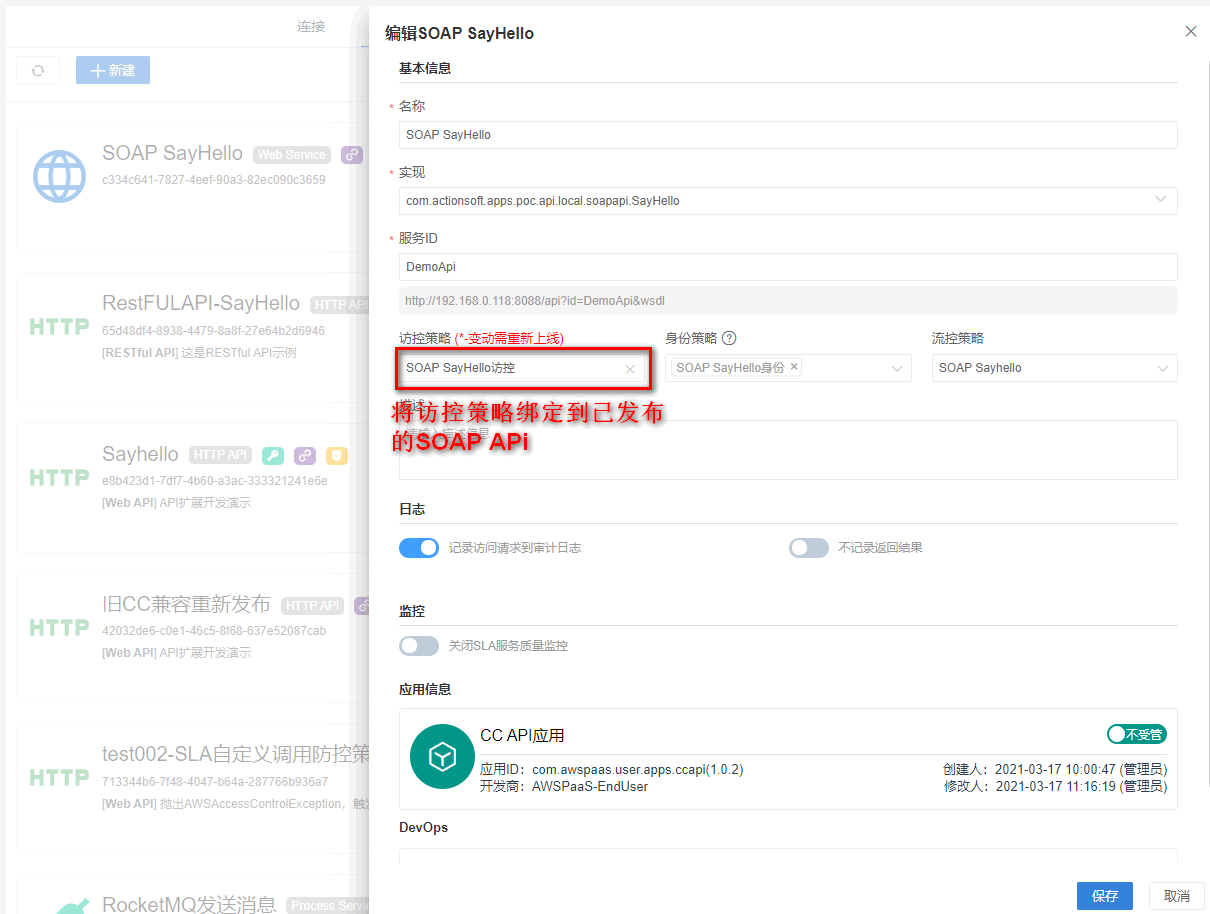
2.进入CC连接服务 > 策略,创建访控策略,策略类型为用于发布,并勾选可用于Web Service。 创建成功后,将策略配置到上述发布的SOAP API
有关访控策略的详细配置与SoapUI工具的对象参见这里
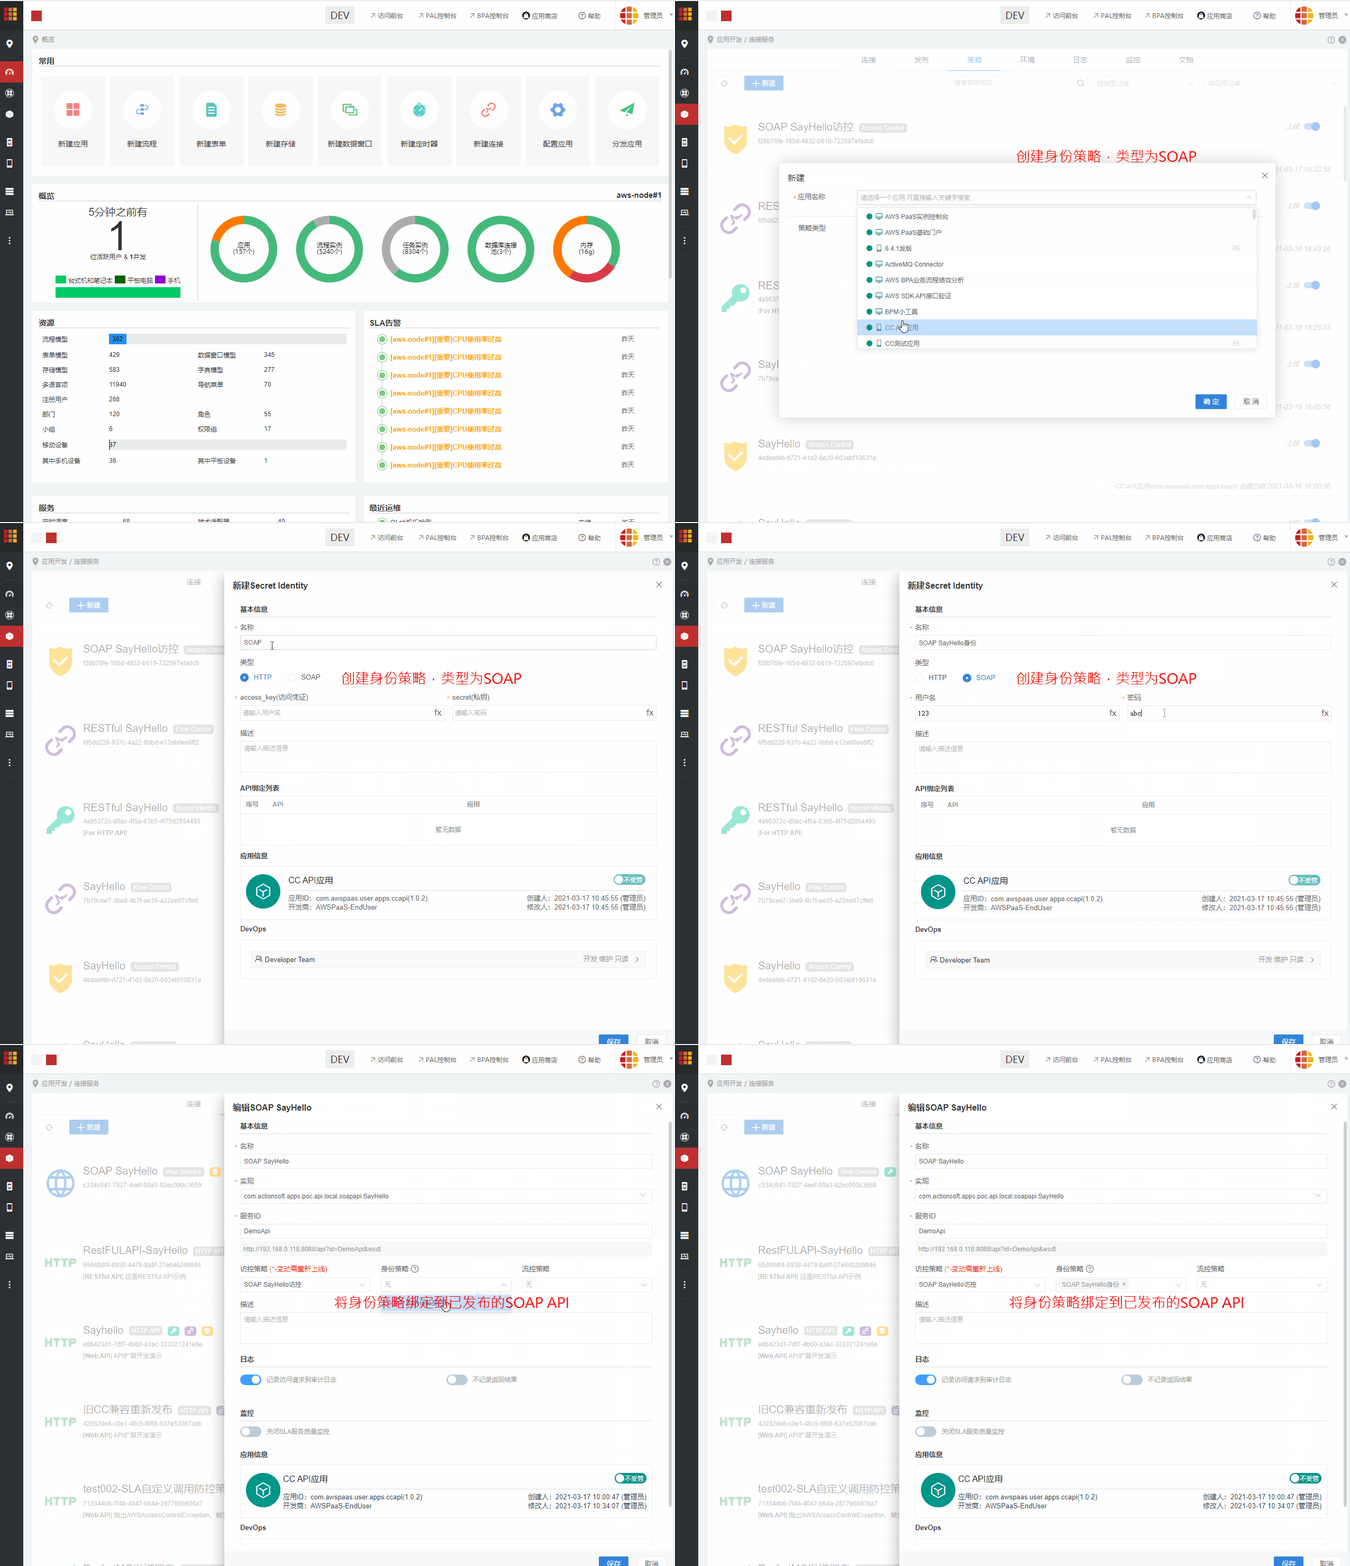
步骤6:配置身份策略(适用于6.4.1及后续版本)
进入CC连接服务 > 策略,创建身份策略,策略类型为SOAP。 创建成功后,将策略配置到上述发布的SOAP API。 如果不配置身份策略,则在调用时,可传入AWS PaaS平台内存在的任意身份策略。 SOAP API 不支持无身份策略调用。
步骤7:配置流控策略(可选)
进入CC连接服务 > 策略,创建流控策略。 创建成功后,将策略配置到上述发布的SOAP API**
有关流控策略的详细介绍参见这里
步骤8:测试发布的API
使用SoapUI测试发布的SOAP服务
测试say方法,请求结构
<soapenv:Envelope xmlns:soapenv="http://schemas.xmlsoap.org/soap/envelope/" xmlns:api="http://api.local.api.poc.apps.actionsoft.com/">
   <soapenv:Header/>
   <soapenv:Body>
      <api:say>
         <!--Optional:-->
         <str1>2017</str1>
      </api:say>
   </soapenv:Body>
</soapenv:Envelope>
测试say方法,返回结果
<soap:Envelope xmlns:soap="http://schemas.xmlsoap.org/soap/envelope/">
   <soap:Body>
      <ns2:sayResponse xmlns:ns2="http://api.local.api.poc.apps.actionsoft.com/">
         <return>
            <data>2017</data>
         </return>
      </ns2:sayResponse>
   </soap:Body>
</soap:Envelope>
测试calc方法,请求结构
<soapenv:Envelope xmlns:soapenv="http://schemas.xmlsoap.org/soap/envelope/" xmlns:api="http://api.local.api.poc.apps.actionsoft.com/">
   <soapenv:Header/>
   <soapenv:Body>
      <api:calc>
         <!--Optional:-->
         <num1>100</num1>
         <!--Optional:-->
         <num2>20</num2>
      </api:calc>
   </soapenv:Body>
</soapenv:Envelope>
测试say方法,返回结果
<soap:Envelope xmlns:soap="http://schemas.xmlsoap.org/soap/envelope/">
   <soap:Body>
      <ns2:calcResponse xmlns:ns2="http://api.local.api.poc.apps.actionsoft.com/">
         <return>
            <num1>100</num1>
            <num2>20</num2>
            <num3>120</num3>
         </return>
      </ns2:calcResponse>
   </soap:Body>
</soap:Envelope>
如果触发流控或访控策略,则会提示"由于流控策略未通过,该请求被限制访问"或 "由于访控策略未通过,该请求被限制访问"
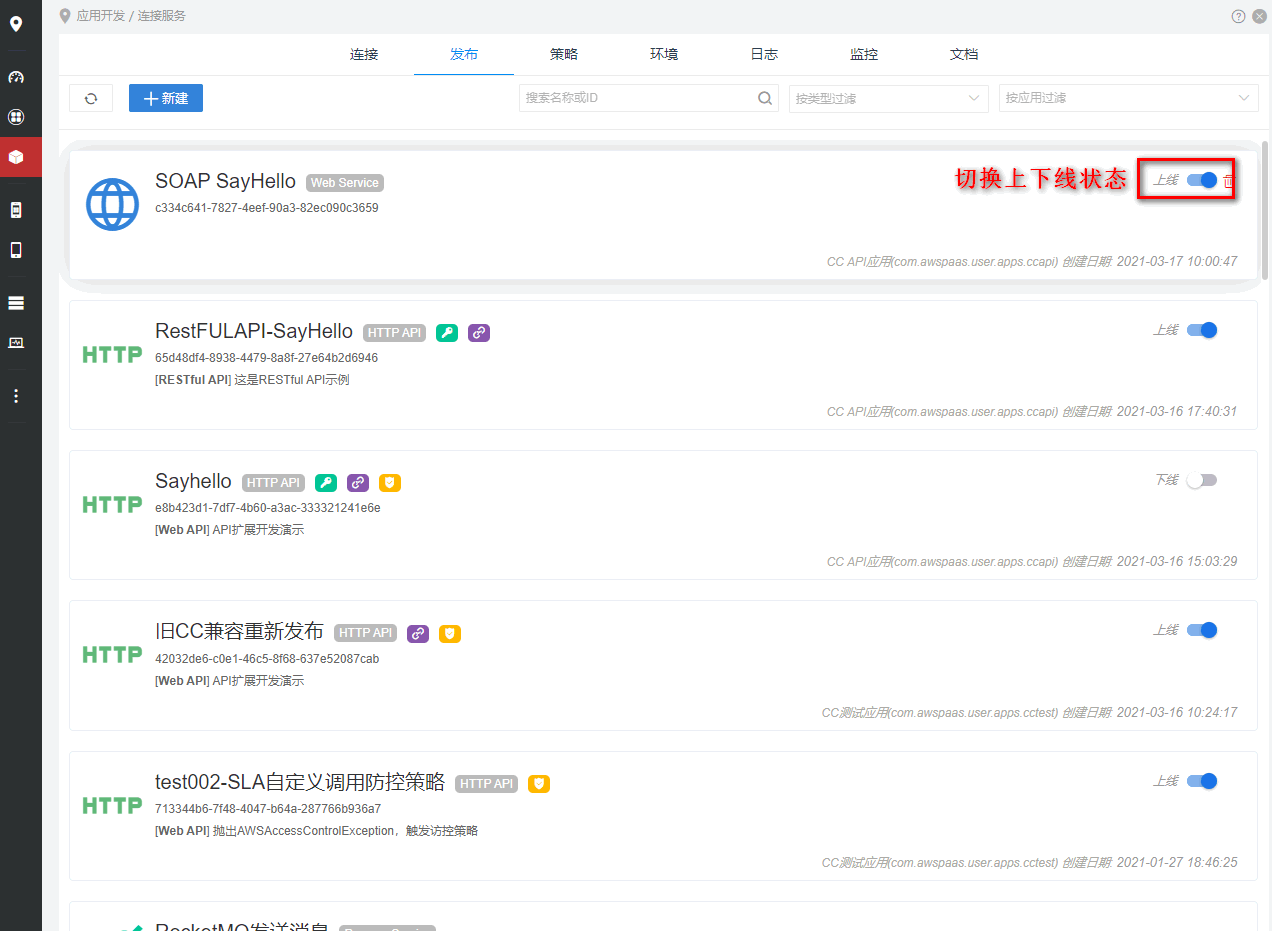
步骤9: 上下线服务
进入发布列表,点击服务上下线按钮,切换状态。 下线的服务,不允许调用。
源码
源码1:SayHello.java
package com.actionsoft.apps.poc.api.local.soapapi;

import com.actionsoft.bpms.cc.api.PermRequire;
import com.actionsoft.bpms.cc.api.RequireType;
import com.actionsoft.bpms.cc.api.perm.PermCustom;
import com.actionsoft.bpms.cc.api.perm.PermDepartment;
import com.actionsoft.bpms.cc.api.perm.PermRole;
import com.actionsoft.bpms.cc.api.perm.PermUser;
import com.actionsoft.bpms.server.bind.annotation.Controller;
import com.actionsoft.bpms.server.bind.annotation.HandlerType;
import com.actionsoft.bpms.server.bind.annotation.Mapping;
import com.actionsoft.bpms.server.bind.annotation.Param;
import com.actionsoft.sdk.service.response.StringResponse;

import javax.jws.WebParam;
import javax.jws.WebService;

@Controller(type = HandlerType.OPENAPI, apiName = "Demo API", desc = "API扩展开发演示")
@WebService(serviceName = "DemoApi")
@PermRequire({RequireType.APP, RequireType.CUSTOM, RequireType.ORG, RequireType.BO, RequireType.PROCESS, RequireType.ALL})// 访控类型注解,根据需要调整
public class SayHello {

    // 返回简单String
    // str1参数增加@PermDepartment @PermRole @PermUser 访控注解,表示校验组织范围,需根据实际需要调整
    @Mapping(value = "demo.say")
    public StringResponse say(@PermDepartment @PermRole @PermUser @Param(value = "str1", desc = "字符串1", required = true) @WebParam(name = "str1") String str1) {
        StringResponse r = new StringResponse();
        r.setData(str1);
        System.out.println(str1);
        return r;
    }

    // 返回自定义的对象
    //num1 num2 增加@PermCustom访策注解,表示校验自定义权限,需根据实际需要调整
    @Mapping(value = "demo.calc")
    public CalcDataResponse calc(@PermCustom @Param(value = "num1", desc = "数字1", required = true) @WebParam(name = "num1") Integer num1, @PermCustom @Param(value = "num2", desc = "数字2", required = true) @WebParam(name = "num2") Integer num2) {
        CalcDataResponse r = new CalcDataResponse(num1, num2);
        return r;
    }

}
源码2:CalcDataResponse.java
package com.actionsoft.apps.poc.api.local.api;

import javax.xml.bind.annotation.XmlRootElement;

import com.actionsoft.bpms.api.common.ApiResponse;

@XmlRootElement
public class CalcDataResponse extends ApiResponse {
    private int num1;
    private int num2;
    private int num3;

    public CalcDataResponse() {

    }

    public CalcDataResponse(int num1, int num2) {
        super();
        this.num1 = num1;
        this.num2 = num2;
        // 计算相加
        num3 = num1 + num2;
    }

    public int getNum1() {
        return num1;
    }

    public void setNum1(int num1) {
        this.num1 = num1;
    }

    public int getNum2() {
        return num2;
    }

    public void setNum2(int num2) {
        this.num2 = num2;
    }

    public int getNum3() {
        return num3;
    }

    public void setNum3(int num3) {
        this.num3 = num3;
    }

}


